Well, that was harder than I thought. I was tired of waiting for Synology to update the WordPress version to the current one and started this little project to install the public version of WordPress on my Synology NAS and to migrate my website to that. Couldn’t be too difficult I thought. But it turned out that there were quite some obstacles to overcome; but finally, I succeeded, and I want to share my experiences with you.
- First of all, I created a new folder in the
webshare of my NAS. That should become the document root of my new WordPress installation. - Then I’ve got the standard WordPress installation from wordpress.org and uploaded it to the new location on my NAS. With the File Station app you can unzip the package on the server and move all files to that document root. It’s a good idea to set the owner of this new directory and all files and subdirectories to „
http“ right now.
- With phpMyAdmin I created a new database for WordPress and a new WordPress user with all rights granted to that database.
- And now comes the more tricky part. In this post I have shown how to create a Customized Portal in the Web Station for the WordPress instance to allow its access under the plain domain name. I removed that and created a new Virtual Host for my plain domain name pointing to the just created directory. I had to increase the default timeouts quite a lot to avoid
504errors during the following installation procedure. - Now it was time to start the browser with the URL to my plain domain. Yes, WordPress installed the website with the supplied information about database and login. Funny enough, as I noticed later, it did not install the necessary
.htaccessfile in the document root. So I copied it from the standard WordPress instance at theweb_packagesdirectory. Again, don’t forget to set its owner tohttp!
- And yes, the new WordPress instance was ready and alive. But, oh oh, as though I could create new pages they were not reachable; I always got error
404 - not found. Looking around in the internet showed the solution quite soon. In the WordPress admin console I had to open theSettings / Permalinksand just save it (even without any change). Now the new page was reachable as expected. - So, that would be sufficient for a new website but I wanted my old one to migrate to the new location. First I tried the nice Duplicator plugin which helped me in other situations a lot already. So, I switched back to the standard WordPress instance by removing the new Virtual Host in the Web Station and recreating the formerly used Package Server Portal for WordPress. My old website was back. I created an installation package of this site with Duplicator and copied it to the document root of the new WordPress installation. Again, don’t forget to set the owner correctly!
- OK, after switching back to the new site in the Web Station as in step 4 I started the installation of the backup by pointing the browser to
domain-name/installer.php. The installer found the working WordPress instance and recognized the settings for the database connection. And finally, with long enough timeouts in Virtual Host settings I could reinstall my old website on the new location. Again, I had to repeat step 6 to make my sub-pages reachable. - But then I noticed that the WordPress version was still the 5.x one from the standard Synology instance. Duplicator reinstalled the complete old WordPress instance with all its settings including the Synology special ones. OK, maybe I could have remove the Synology specialities and update that instance to the current version but I decided to start over again with a clean installation (from Step 1).
- Now I used the UpdraftPlus plugin to make a regular backup of my old website installation.
- After switching back to the new WordPress instance I restored the UpdraftPlus backup. And yes, it did not reinstall the old WordPress instance but only the rest (theme, plugins, media and content). Finally, I made it and I am happy now.
Good luck if you plan a similar project.
Update August 18, 2023:
OK, since DSM 7.2 Synology changed the creation of virtual hosts quite a bit. So here comes my update of step 4 of the recipe above:
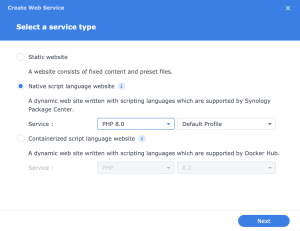
- We cannot directly create a virtual host with DSM 7.2 anymore. Instead, we have to create a Web Service first. So let’s do that.

- This will be a „Native script language website“, i.e. a PHP one. We have to select the correct PHP version and profile depending on the needs of our WordPress instance (e.g. PHP 8.0).
- And now we can specify the document root and the Apache Server. As mentioned in the original post already I had to increase the timeouts substantially to make the following steps successful.
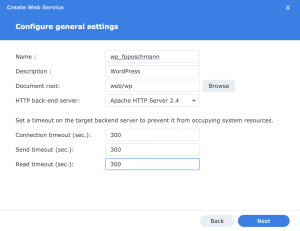 That’s it for the Web Service.
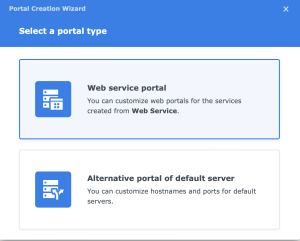
 - And now we can create the actual „Web Portal“. It will be a „Web service portal“.
- Here we specify the just created Web Service and the domain name under which this service will be reachable. I have done this twice for my domain name (fpposchmann.de) and the www variant (www.fpposchmann.de) point to the same Web Service.
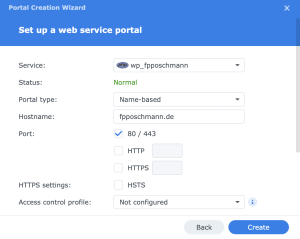
- That’s it. Have fun.
Thanks for the tutorial. Unfortunately, this method doesn’t seem to work in Web Station under DSM 7.2 as there’s no longer an option to create a virtual host (therefore no ability to specify document root). Do you know of any workarounds?
Yes, you’re right. With DSM 7.2 you can’t create a virtual host directly anymore. Please look at the update of my post.
Hi, thank you very much for your post!! I have a question, did you enable mod rewrite? i can’t find this option 🙁
Well, it should be enabled by default. At least it is on my Synology NAS. You can check it by looking at the apache conf file at
/usr/local/etc/apache24/conf/httpd24.confOn my machine it is loaded with
LoadModule rewrite_module modules/mod_rewrite.soIf that’s not the case for you, you could create your own conf file in the same directory with the above mentioned statement. Good luck.